Saturday 15 October 2016

SET UP #IP CAMERA WIFI AND ROUTERED

Setting WiFi connection with wireless IP Cameras


Before you begin you will need:
  • Camera MUST be WIRED directly to your router and powered on
  • Router IP address range
  • Gateway address (this is your router's IP address)

>You will need to install the IPC Search software located here:

Once installed:
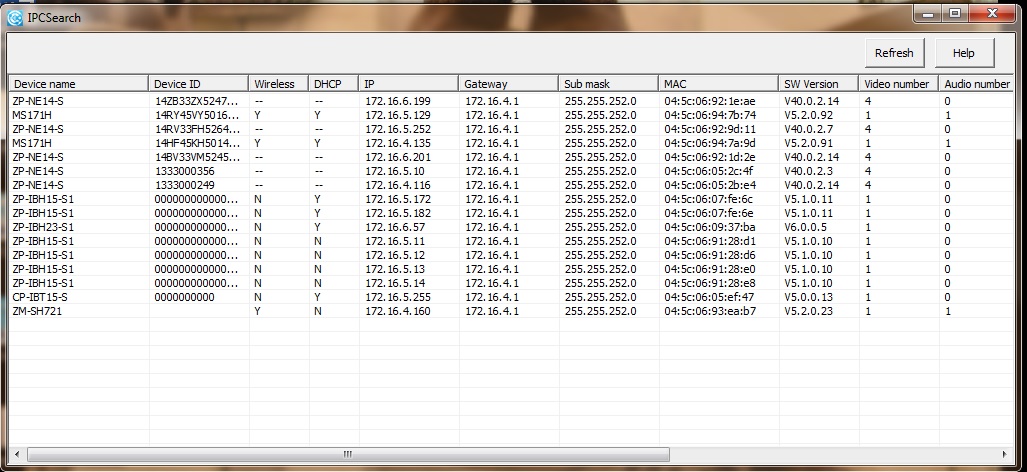
>Click "refresh" to find wireless devices.

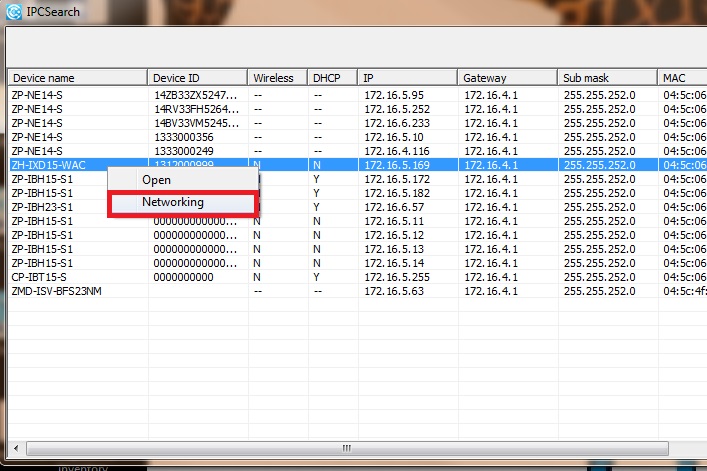
Next, move the mouse to the device you want to set up and right click. You will see two options, left click on "Networking".
IPC search net opt

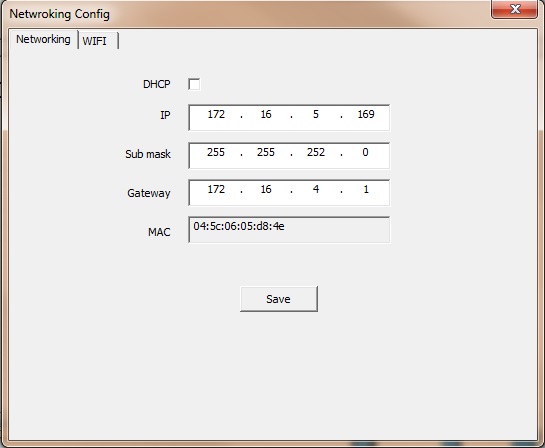
A new window will open as shown below (notice the two tabs, Networking and WiFi). First, click on the the "WiFi tab", uncheck the DHCP option at the top. Next, enter the IP address and gateway as needed to work with your router.
IPC search tool

You will want to open the camera in an Internet Explorer browser. Example, if the IP address you gave the camera was 192.168.1.50, then you will type http://192.168.1.50 in the browser's address bar and then hit enter. Once you get to the login screen, be sure to enable compatibility view in the browser settings (In IE, tools>compatibility view). You will need to login with your username and password.
Default username: admin    Password: 111111

Click on the gear(settings) the go to the Network section and make sure you uncheck DHCP and save the settings. You then want to click on Wireless Settings. You may need to fill in the proper IP address information to match the settings you entered earlier. You will then double click on the wireless router that should have come up in the list below. You will enter your wireless password and choose connect. It should say succeed and then you will choose save. After both options succeed you can close out of that configuration box.
****WEP is not an acceptable security key option and the camera will not accept any WiFi network with this type of security encryption. You must use WPA/WPA2.

Tags: configIP cammanualsetupsetupwifi

How to view your #IP camera remotely via a web browser

NON WIFI
Note: The steps below assume you already have your IP camera installed and connected to a router with Internet access.HTTP://192.168.1.101 represents the IP address of the camera being accessed.
Step 1
Find your camera’s IP address. If you don’t know its IP address, click here.

Step 2
Open a web browser and type the IP address. Enter your login information.
 
Step 3
Go to SETTING > BASIC > Network > Information to find the HTTP port number used by the camera. The default is 80.
Usually there is no need to change the port number. However some ISPs block port 80, so you may need to change the port number accordingly. In the image below, we changed it to 3333.

Step 4
After you change the port, you will need to reboot the camera in order to save the changes. You can do that by going to SETTING > BASIC > System > Initialize and clicking Reboot.

Step 5
After you reboot, log back into the camera on your web browser, using
http://(IP address):(Camera port number).

For this example, the address would be http://192.168.1.101:3333.

After this, you’ll need to adjust the port forwarding settings on your router. The configuration depends on the router model. Consult your router’s technical support accordingly. For this example, we are using a TP-Link TL-WR941ND.

Step 1
Log into your router’s management page (http://www.tp-link.us/faq-87.html).
Go to Forwarding > Virtual Servers and click Add New.

Step 2
Type the IP address and the port used by the camera in the corresponding field. For the Protocol, we recommend you select ALL. Click Saveto add this new entry.
Step 3
Port 3333 can now be used by the camera.

Step 4
Go to Status page to check the WAN IP address of the router.

Step 5
On a different PC (one that’s not connected to the same network as your camera), you can view your camera by opening the web browser, typing http://(IP address):(Camera port number) and pressing Enter.

For this example, the address would be http://192.168.1.101:3333.

Wednesday 7 September 2016

How to Crop (ELIMINATE BACKGROUND ) a Circle in Photoshop

SUMMARY
1.    Step 1: Open your image in Photoshop. ...
2.    Step 2: Double-click on the Background layer and make it a Normal layer – just click OK. ...
3.    Step 3: Select the Elliptical Marquee Tool. ...
4.    Step 4: Create the circle. ...
5.    Step 5: Inverse the layer. ...
6.    Step 6: Delete the outer layers. ...
7.    Step 7: Crop your image to save.

HERE ARE SOME DETAILS TRY ,practice its the best way to learnDo not expect spoon- feeding please.Then your brian will be rusted.
Step 1: Open your image in Photoshop
 have the image and no other layers.

Step 2: Double click on the Background layer and make it a Normal layer – just click OK.

Step 3: Select the Elliptical Marquee Tool

Step 4: Create the circle
Drag your mouse and create a circle – Photoshop has numeric guidelines so you can see how big it is. Help- If you hold SHIFT while you move it will retain a perfect circle.
Step 5: Inverse the layer
Once your circle is created, go to the toolbar and hit Select > Inverse.
photoshop inverse the layer

Step 6: Delete the outer layers
Once you’ve hit inverse, a dashed box will appear around the rest of the image. Hit delete. Poof! It all goes away.
Step 7: Crop your image to save
Go back to your marquee tool and switch to Rectangular – select the area right around your image. Then to go Toolbar > Image > Crop. This will remove all excess space around your image.
Step 8: Save as .png -IMPORTANT
Save the image as a .png format using the dropdown. This will save the image with no background (unlike JPEG and the others) so that whatever color or pattern is behind this image when you upload it or use it, the border will start with your perfect circle.

Friday 5 August 2016

Flat roof MAKE IT YOUR SELF-ITS EASY AS A B C

Flat roof  MAKE IT YOUR SELF-ITS EASY AS A B C

ALL IS HERE  JUTS READ FOLLOW


http://buildingmaterials.com.my/structural-materials/purlin/


What is a Purlin

C and Z Purlins - Building Materials Malaysia

A purlin, historically called a purling, perling, purline or purloyne is a horizontal beam or bar used for structural support in buildings, usually any longitudinal, horizontal, structural member in a roof.
Purlins are supported either by rafters or the walls of the building. The purlins of a roof support the weight of the roof deck. The roof deck is the metal sheeting, the wood panel or the ply board that creates the surface of the roof.

Types of Purlin

There are several kinds of purlins and are divided into different categories based on their material and shape. Different purlins have different uses.

Example of a C Purlin

C Purlin - Building Materials Malaysia

C Purlin 2 - Building Materials Malaysia

Examples of a Z Purlin

Z Purlin - Building Materials Malaysia
Purlins can be made from solid beams of wood but the steel purlin is most commonly used in roofing, made fromcold-formed steel that is thin enough to insert screws through.
Cold steel is made by pressing thin sheets of steel into their suitable shapes and is stronger than hot-formed steel and less costly. In steel construction, the term purlin commonly refers to roof framing members that span parallel to the building eave and support the roof decking or sheeting.
The purlins are in turn supported by rafters or walls. In steel construction, secondary members such as purlins (roof) and girts (wall) are frequently  C, Z or U sections, (or mill rolled) C sections.
Cold-formed steel can be efficient on a weight basis relative to mill rolled sections for secondary member applications.

Applications of Purlin

Purlin Details - Building Materials Malaysia

Steel Type
There are 3 types of steel purlins. In the construction of the roofs, the rectangular hollow section is used where the support structure is visible when the construction is complete and the rectangular shape makes the roof aesthetically better looking.
The C purlins are shaped like a squared-off letter C and commonly used for structural support in walls, roofs and as floor joists. C purlins are also used to form braces, columns or ties in sheds.
The Z purlin is shaped like the letter Z and also commonly used in walls or for large roofing projects. Their shapes gives it the flexibility to overlap with others at the joints to form structurally stronger and continuous beams across multiple supports and are thus stronger than the C purlins.
Additionally the Z sections can be nested for more efficient transportation and, on the building, lapped at the supports. Visualisations can be seen in image below.

Purlin Applications - Building Materials Malaysia

Wood Type
In traditional timber or wood construction, the three basic types of purlin are the plate, the principal and the common.
The common purlins are typically “trenched through” the top sides of the principal rafters and they carry vertical roof sheathing or vertically laid boards with seams covered with battens.
Purlin plates are major horizontal beams which support the mid-span of rafters and are supported by posts. When the rafters are supported, this allow for longer spans than the rafters alone could span so wider buildings can be constructed.
Principal purlins are also called “major purlin” or “side purlin”. They are supported by principal rafters and support common rafters and further classified by how they connect to the principal rafters.
“Through purlins” pass over the top of the principal rafters but “butt purlins” are tenoned into the sides of the principal rafters whereas the “clasped purlins” are those that are clutched by a collar beam.
Confusing? Just refer to image below as a sample, but of course configurations vary according to designs too.

Wood Purlin - Building Materials Malaysia

Thursday 4 August 2016

https://www.youtube.com/watch?v=cVDTNOj604A

Wednesday 3 August 2016

Track your car /phone-wallet and do more at Fraction of cost you think

New tracking method 

Lost your car and can’t remember where you parked? It happens to the best of us: wandering aimlessly through parking lots, clicking the panic button on your key chain to get your headlights to illuminate.
You don’t need a pricey radio transponder to keep tabs on your car. Uplinking your wheels to the great eye in the sky without breaking the bank is easier than you think.
Standalone GPS and radio triangulation units can cost hundreds. And that’s not counting the installation, activation fees, and monthly fees associated with whatever service you do choose. For most of us, it’s overkill. The good news is that some of life’s biggest problems seem to be disappearing because of new technology. If you frequently forget where you parked your car, there is a tiny gadget and app that could be what you’re looking for.

What is it about?

It’s about Trackr, A small and discreet device the size of a coin that is revolutionizing the market.
trackr-bravo-4

But… How does it work?

Very easy! It will take less than five minutes to put it to work. You simply pair it with your smartphone and download the free application which will allow you to locate it anytime.
Once this is done, you simply have to put it on your key chain, in your wallet or in any object you want to locate. In this case you just have to hide it in your car.
maps
Now you just open the application on your smartphone and you can easily see the position of your TrackR on the map. If you lose your car or any other item, simply select “find device” and you’ll get the coordinates of the new location.

With Trackr you’ll be able to locate your car at any time

In the following video you’ll be able to see it in action:

How much is it going to cost me?

You are probably thinking that this device will be very expensive…nope. This is the best part, you can acquire one for so little, the price is about $29. Not bad considering it gives peace of mind.


by
red -dot
event other 

Other functions

Do you often forget your wallet? Forget where you left your keys? Or want to prevent your pet from escaping? With Trackr you can also track your personal belongings. Simply attach it to anything you consider important or easy to lose, link it to your Smartphone (with the Trackr application) and you will find what you lost, it’s that easy!

Detailed instructions on how to use Trackr

  Get Trackr from this website, you’ll get it delivered to your home in about 1 week.
  • Step 1: Get Trackr from this website, you’ll get it delivered to your home in about 1 week.
  • Step 2: Link Trackr Bravo with your Smartphone (iPhone or Android) and hide it in your car.
  • Step 3: Download the app and always have in hand the location of your valuables.
  • PRO TIP: TrackR is a great gift idea because THERE IS NO MONTHLY SUBSCRIPTION!
They have an amazing summertime sale going on right now and if you buy 4 TrackR’s they will send you 4 additional Trackr’s for FREE!
So pick up 4 TrackR’s and get 4 for FREE so you and your family can keep track of everything: Suitcases, pets, keys, bikes, toys, and even electronics like your iPad, laptop or kindle!functions

Saturday 30 July 2016

The Negative Photo-illusion Try Keep trying-retinal fatigue


Experience  retinal fatigue ---the world is limited only what you see yourself ,rest come from imagination only if you have ---plenty of them to make them even wider.

Stare at the colored dots on the girl's nose in the photo above for 30 seconds. Then look at a white surface (blank browser, mayhaps) and start blinking. You should see a non-negative image of the girl. WHAT. BRAIN. MELTING. WHAT. OHMYGOD. Yep, that jiggly stuff in your head just processed a negative image. Sweet


The Negative Photo Illusion

Negative Photo illusion
Image by geloo, modified by Kendra Cherry
Did you think that you needed a darkroom to process a negative photo into a full-color image? In this fun optical illusion, you can see how your visual system and brain are actually able to briefly create a color image from a negative photo.

How to Perform the Illusion

  1. Stare at the dots located at the center of the woman's face below for about 30 seconds to a minute.
  2. Then turn your eyes immediately to the center x of the white image on the right.
  3. Blink quickly several times.
What do you see? If you've followed the directions correctly, you should see an image of a woman in full-color. If you are having trouble seeing the effect, try staring at the negative image a bit longer or adjusting how far you are sitting from your computer monitor.

Explanations

How does this fascinating visual illusion work?
What you are experiencing is known as a negative afterimage. This happens when the photoreceptors, primarily the cone cells, in your eyes become overstimulated and fatigued causing them to lose sensitivity. In normal everyday life, you don't notice this because tiny movements of your eyes keep the cone cells located at the back of your eyes from becoming overstimulated.
If, however, you look at a large image, the tiny movements in your eyes aren't enough to reduce overstimulation. As a result, you experience what is known as a negative afterimage. As you shift your eyes to the white side of the image, the overstimulated cells continue to send out only a weak signal, so the affected colors remain muted. However, the surrounding photoreceptors are still fresh and so they send out strong signals that are the same as if we were looking at the opposite colors. The brain then interprets these signals as the opposite colors, essentially creating a full-color image from a negative photo.
According to the opponent process theory of color vision, our perception of color is controlled by two opposing systems: a magenta-green system and a blue-yellow system. For example, the color red serves as an antagonistic to the color green so that when you stare too long at a magenta image you will then see a green afterimage. The magenta color fatigues the magenta photoreceptors so that they produce a weaker signal. Since magenta's opposing color is green, we then interpret the afterimage as green.

How to cut a Round Image and more using word and paint (or powerpoint)

Steps to Crop a Round Shape Using Word and MS Paint
  1. Step 1: Open the base image from which you want to crop a circular section. ...
  2. Step 2: Open MS Word. ...
  3. Step 3: On the MS Word canvas draw the shape with the size that you want. ...
  4. Step 4: Keep the shape selected. ...
  5. Step 5: Right-click on the shape and select Format AutoShape.
  6. Step 4: Keep the shape selected. Drawing Tools will get activated with a Format tab under it. Switch to Format and then choose Shape Fill -> Picture. Choose the picture that you saved in Step 1. Your picture will be inserted and contained flawlessly within the shape.

To get an image a complete round shape easily using Paint and Word. It may not seem like an exact crop activity, but the result is good enough. And then you may save the resulting creation as an independent image or place it over some  background. Let s   go

Steps to Crop a Round Shape Using Word and MS Paint

We are going to use MS Word here. The concept comes from the fact that we can insert images within a shape that we create on MS Word (or even PowerPoint).
Step 1: Open the base image from which you want to crop a circular section. Crop a rectangular section on the area that you visualize for a round crop shape. Save this crop as an independent image. Here’s the sample crop that I saved.


Step 2: Open MS Word. Navigate to Insert  tab -> Shapes and choose Oval (ellipse).
MS-Word-Oval-Shape
Step 3: On the MS Word canvas draw the shape with the size that you want. Hold Shiftwhile drawing the shape; it helps to create a perfect circle.
MS-Word-Draw-Circle
Step 4: Keep the shape selected. Drawing Tools will get activated with a Format tab under it. Switch to Format and then choose Shape Fill -> Picture. Choose the picture that you saved in Step 1. Your picture will be inserted and contained flawlessly within the shape.
Fill-Shape-Picture
Step 5: Right-click on the shape and select Format AutoShape. Our aim here is to remove the shape border.
Format-Auto-Shape
Step 6: Ensure to be on the Colors and Lines tab. Under Lines section, go to Color and select No Color. Click on Ok when you are done.
Shape-No-Line-Color
Step 7: Right-click on the resulting shape and Copy it on to the clipboard. You may do a Ctrl + C as well.
Copy-Shape
Step 8: Go back to MS Paint and paste the contents of the clipboard there. You may now save the image.
Save-Image
If you plan to paste this over a different background (other than white) make sure thatTransparent selection is on before you paste the image.
Enable-Paint-Transparent

Conclusion

The process may be a little time consuming but it is a foolproof technique to crop a round shape on MS Paint. It may come in handy when you do not have ready accessibility to those top notch tools like Photoshop (as Paint and Word should be there by default).
Besides it is a way to give a perfect round shape to an image. What say? You may try this with other shapes as well. 🙂 Also check out the trick we have covered on cropping and editing images using MS PowerPoint.